9: Setting up Hadoop Cluster
- It explains how to set up Hadoop to run on cluster of machines.
Running HDFS and MapReduce on single machine is great for learning about these systems, but to do useful work, they need to run on multiple nodes.
Cluster Specification:
- Hadoop is designed to run on commodity hardware.
- You can choose standardized, commonly available hardware from any of large range of vendors to build your cluster.
- Commodity does not mean low end.
- Hardware specifications rapidly become obsolete, but for sake of illustration, typical choice of machine for running Hadoop datanode and tasktracker in mid-2010 would have following specifications:
Processor: 2 quad-core 2-2.25 Ghz CPUs.
Memory: 16-24 GB ECC RAM
Storage: 4 by 1TB SATA disks
Network: Gigabit Ethernet
Hadoop is designed to use multiple cores and disks, so it will be able to take full advantage of more powerful hardware.
Why not use RAID?
- HDFS clusters do not benefit from using RAID(Redundant Array of Independent Disks) for datanode storage(although RAID is recommended for namenodes disks, to protect against corruption of its metadata).
- Redundancy that RAID provides is not needed, since HDFS handles it by replication between nodes.
- RAID striping(RAID 0), which is commonly used to increase performance, turns out to be slower than JBOD(Just a bunch of disks) used by HDFS.
- RAID 0 read and write operations are independent, so average speed of slowest disk in RAID array.
- In JBOD, disk operations are independent, so average speed of operations is greater than that of slowest disk.
- If disk fails in JBOD configuration, HDFS can continue to operate without the failed disk, whereas with RAID, failure of single disk causes whole array to become unavailable.
- The bulk of Hadoop is written in Java, and therefore run on any platform with JVM, although there are enough parts that Harbor Unix assumptions to make it unwise to run on non-Unix platform in production.
How large should cluster be?
- You can start with small cluster(say, 10 nodes) and grow it as your storage and computational needs grow.
- How fast does my cluster need to grow? You can get good feel for this by considering storage capacity.
- If your data grows by 1TB a week, and you have three way HDFS replication, then you need an additional 3TB of raw storage per week.
- In this example, cluster that holds two years of data needs 100 machines.
- For small cluster(on order of 10 nodes), it is usually acceptable to run the namenode and jobtracker on single master machine.
- As the cluster and number of files stored in HDFS grows, namenode needs more memory, so the namenode and jobtracker should be moved onto seperate machines.
- Secondary namenode can be run on same machine as namenode, but again for reasons of memory usage, it is best to run it on seperate peice of hardware, especially for large clusters.
- Machines running the namenodes should typically run on 64-bit hardware to avoid the 3GB limit on Java heap size in 32-bit architecture.
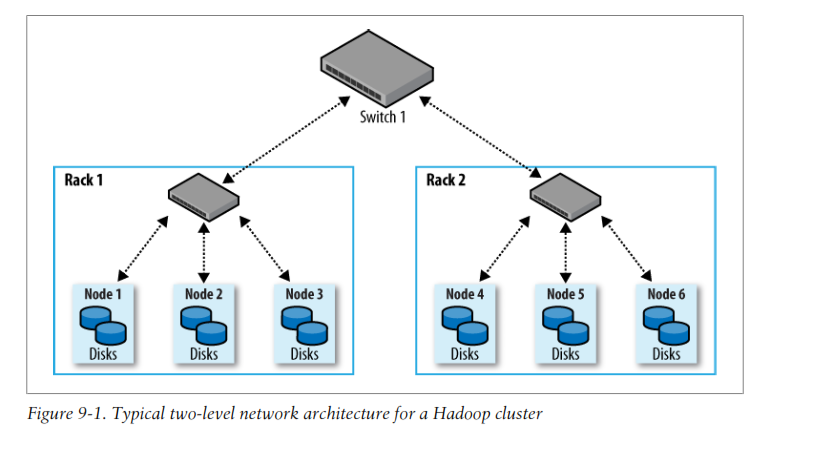
Network Topology:
- Common Hadoop cluster architecture consists of two level network topology.
- Typically there are 30 to 40 servers per rack with a 1GB switch for the rack, and an uplink to core switch or router(which is normally 1GB or better).
- Salient point is that aggregate bandwidth between nodes on same rack is much greater than that between nodes in different racks.
-


- It explains how to set up Hadoop to run on cluster of machines.
Running HDFS and MapReduce on single machine is great for learning about these systems, but to do useful work, they need to run on multiple nodes.
Cluster Specification:
- Hadoop is designed to run on commodity hardware.
- You can choose standardized, commonly available hardware from any of large range of vendors to build your cluster.
- Commodity does not mean low end.
- Hardware specifications rapidly become obsolete, but for sake of illustration, typical choice of machine for running Hadoop datanode and tasktracker in mid-2010 would have following specifications:
Processor: 2 quad-core 2-2.25 Ghz CPUs.
Memory: 16-24 GB ECC RAM
Storage: 4 by 1TB SATA disks
Network: Gigabit Ethernet
Hadoop is designed to use multiple cores and disks, so it will be able to take full advantage of more powerful hardware.
Why not use RAID?
- HDFS clusters do not benefit from using RAID(Redundant Array of Independent Disks) for datanode storage(although RAID is recommended for namenodes disks, to protect against corruption of its metadata).
- Redundancy that RAID provides is not needed, since HDFS handles it by replication between nodes.
- RAID striping(RAID 0), which is commonly used to increase performance, turns out to be slower than JBOD(Just a bunch of disks) used by HDFS.
- RAID 0 read and write operations are independent, so average speed of slowest disk in RAID array.
- In JBOD, disk operations are independent, so average speed of operations is greater than that of slowest disk.
- If disk fails in JBOD configuration, HDFS can continue to operate without the failed disk, whereas with RAID, failure of single disk causes whole array to become unavailable.
- The bulk of Hadoop is written in Java, and therefore run on any platform with JVM, although there are enough parts that Harbor Unix assumptions to make it unwise to run on non-Unix platform in production.
How large should cluster be?
- You can start with small cluster(say, 10 nodes) and grow it as your storage and computational needs grow.
- How fast does my cluster need to grow? You can get good feel for this by considering storage capacity.
- If your data grows by 1TB a week, and you have three way HDFS replication, then you need an additional 3TB of raw storage per week.
- In this example, cluster that holds two years of data needs 100 machines.
- For small cluster(on order of 10 nodes), it is usually acceptable to run the namenode and jobtracker on single master machine.
- As the cluster and number of files stored in HDFS grows, namenode needs more memory, so the namenode and jobtracker should be moved onto seperate machines.
- Secondary namenode can be run on same machine as namenode, but again for reasons of memory usage, it is best to run it on seperate peice of hardware, especially for large clusters.
- Machines running the namenodes should typically run on 64-bit hardware to avoid the 3GB limit on Java heap size in 32-bit architecture.
Network Topology:
- Common Hadoop cluster architecture consists of two level network topology.
- Typically there are 30 to 40 servers per rack with a 1GB switch for the rack, and an uplink to core switch or router(which is normally 1GB or better).
- Salient point is that aggregate bandwidth between nodes on same rack is much greater than that between nodes in different racks.
-
- If cluster runs on single rack, then there is nothing more to do, since this is default.
- For multirack clusters, you need to map nodes to racks.
- By doing this, hadoop will prefer within rack transfers to off rack transfers when placing MapReduce tasks on nodes.
- HDFS will be able to place replicas more intelligently to trade off performance and resilience.
- namenode uses the network location when determining where to place block replicas., MapReduce scheduler uses network location to determince where closest replica is as input to map task
- Since there is only one top level switch in this cluster, locations can be simplified to /rack1 and /rack2.
- Hadoop configuration must specify map between node address and network locations.
- Map is described by Java interface, DNSToSwitchMapping, whose signature is:
public interface DNSToSwitchMapping {
public List<String> resolve(List<String> names);
}
- names parameter is list of IP addresses, and the return value is list of corresponding network location strings.
- The topology.node.switch.mapping.impl configuration property defines an implementation of the DNSToSwitchMapping interface that namenode and jobtracker use to resolve worker node network locations.
- For the network in our example, we would map node1, node2 and node3 to /rack1, and node4,node5 and node6 to /rack2.
- The script location is controlled by property topology.script.file.name.
- If no script location is specified, default behavior is to map all nodes to single network location, called /default-rack.
Cluster Setup and Installation:
- There are various ways to install and configure hadoop.
- Here we see how to do it from scratch using Apache Hadoop distribution.
- To ease the burden of installing and maintaining same software on each node, it is normal to use automated installation method like Red Hat Linux kickstart or Debians Fully automatic installation.
- These tools allow to automate operating system installation by recording the answers to questions that are asked during installation process.
- They also provide hooks to run scripts at end of the process, which are invaluable for doing final system tweaks and customization not covered by standard installer.
Below section describes the customization that are needed to run Hadoop. These should be added to the installation script.
Installing Java:
- Java 6 or later is required to run Hadoop.
- % java -version
java version "1.6.0_12"
Java(TM) SE Runtime Environment (build 1.6.0_12-b04)
Java HotSpot(TM) 64-Bit Server VM (build 11.2-b01, mixed mode)
Creating a Hadoop User:
- It is good practice to create dedicated Hadoop user account to seperate the Hadoop installation from other services running on same machine.
- For small clusters, some administrators choose to make the users home directory an NFS-mounted drive, to aid with SSH key distribution.
- NFS server is typically outside the Hadoop cluster.
- If you use NFS, it is worth considering autofs, which allows you to mount the NFS filesystem on demand, when the system accesses it. Autofs provides some protection against the NFS server failing and allows you to use replicated filesystems for failover. There are other NFS gotchas to watch out for, such as synchronizing UIDs and GIDs. For help setting up NFS on Linux, refer to the HOWTO at http://nfs.sourceforge.net/nfs-howto/index.html.
Installing Hadoop:
- Download Hadoop from Apache Hadoop releases page (http://hadoop.apache.org/
core/releases.html), and unpack contents of distribution in sensible location.
such as /usr/local (/opt is another standard choice). Note that Hadoop is not installed
in the hadoop user’s home directory, as that may be an NFS-mounted directory:
% cd /usr/local
% sudo tar xzf hadoop-x.y.z.tar.gz
We also need to change owner of Hadoop files to be the Hadoop user and group:
% sudo chown -R hadoop:hadoop hadoop-x.y.z
Some admins like to install HDFS and MapReduce in seperate locations on same system.
- Seperate installation of HDFS and MapReduce can still share configuration by using the --config option to refer to a common configuration directory.
- They can also log to same directory, as the logfiles they produce are named in such a way as to avoid clashes.
Testing the installation:
- Once you have created the installation script, you are ready to test it by installing it on the machines in your cluster.
- When its working, you can proceed to configure Hadoop and give it a test run. This process is documented in following sections:
SSH Configuration
- Hadoop control scripts(but not the daemons) rely on SSH to perform cluster wise operations.
- For ex, there is script for stopping and starting all daemons in the cluster.
- Note that the control scripts are optional - cluster wide operations can be performed by other mechanisms, too.
- To work seamlessly, SSH needs to be set up to allow password less login for hadoop user from machines in the cluster.
- Simplest way to achieve this is to generate public/private key pair, and place it in an NFS location that is shared across the cluster.
- First, generate an RSA key pair by typing the following in the hadoop user account:
% ssh-keygen -t rsa -f ~/.ssh/id_rsa
- Even though we want password less logins, keys without passphrases are not considered good practice, so we specify passphrase when prompted for one.
- We shall use ssh-agent to avoid the need to enter password for each connection.
- Private key is in the file specified by the -f option, ~/.ssh/id_rsa and the public key is stored in file with same name with .pub appended, ~/.ssh/id_rsa.pub.
- Next we need to make sure that the public key is in the ~/.ssh/authorized_keys file on all the machines in the cluster that we want to connect to.
- If the Hadoop users home directory is in NFS filesystem, then keys can be shared across the cluster by typing:
% cat ~/.ssh/id_rsa.pub >> ~/.ssh/authorized_keys
- If the home directory is not shared using NFS, then the public keys will need to be shared by some other means.
- Test that you can SSH from master to worker machine by making sure ssh-agent is running, and then run ssh-add to store your passphrase.
- You should be able to ssh to worker entering the passphrase again.
Hadoop Configuration:
- There are handful of files for controlling configuration of Hadoop installation; most important ones are listed below for MapReduce 1, which employes jobtracker and tasktracker daemons.
- All these files are found in the conf directory of the Hadoop distribution.
- Configuration directory can be relocated to another part of the filesystem as long as daemons are started with the --config option specifying the location of this directory on local filesystem.
Configuration Management:
- Each Hadoop node in the cluster has its own set of configuration files and it is up to administrators to ensure that they are kept in sync across the system.
- Hadoop provides a rudimentary facility for sychronizing configuration using rsync, alternatively, there are parallel shell tools that can help do this, like dsh or pdsh.
- Hadoop is designed so that it is possible to have single set of configuration files that are used for all master and worker machines.
- Great advantage of this is simplicity, both conceptually and operationally.
- If you expand the cluster with new machines that have a different hardware specification to existing ones, then you need different configuration for new machines to take advantage of their extra resources.
- In these cases, you need to have concept of class of machine, and maintain separate configuration for each class.
- Hadoop does not provide tools to do this, but there are several excellent tools for doing precisely this type of configuration management such as Chef Puppet, cfengine and bcfg2.
- For cluster of any size, it can be challenge to keep all of the machines in sync: consider that happens if machine is unavailable when you push out an update - who ensures that it gets update when it become available? so it is good idea to use configuration management tools for maintaining the cluster.
- These tools are also excellent for doing regular maintainence, such as patching security holes and updating system packages.
Control scripts:
- Hadoop comes with scripts for running commands, and starting and stopping daemons across the whole cluster.
- To use these scripts, you need to tell hadoop which machines are in cluster.
- There are two files called master and slave, each of which contains a list of machine hostnames or IP addresses, one per line.
- The masters file is actually a misleading name, it determines which machine or machines should run secondary namenode.
- Slave file lists the machines that datanodes and tasktrackers should run on.
- Both master and slave files reside in configuration directory, although the slaves file may be placed elsewhere by changing the HADOOP_SLAVES setting in hadoop-env.sh.
- These files do not need to be distributed to worker nodes as they are used only by control scripts running on namenode or jobtracker.
- We dont need to specify which machine(machines) the namenode and jobtracker runs on in the masters file, as this is determined by machine the scripts are run on.
- For ex, start-dfs.sh script, which starts all HDFS daemons in cluster, runs the namenode on machine the script is run on.
It starts namenode on local machine
Starts datanode on each machine listed in slaves file
Starts secondary namenode on each machine listed in masters file
- There is similar script called start-mapred.sh, which starts all the MapReduce daemons in the cluster.
- It starts jobtracker on local machine
- Starts tasktracker on each machine listed in slaves file.
Also provided are stop-dfs.sh and stop-mapred.sh scripts to stop the daemons started by corresponding start script.
- These scripts start and stop Hadoop daemons using hadoop-daemon.sh script.
- If you need to control Hadoop Daemons from another system of from your own scripts, then hadoop-daemon.sh script is good integration point.
- Similarly, hadoop-daemons.sh is handy for starting the same daemon on set of hosts.
Master node scenarios
- Depending on size of cluster, there are various configurations for running the master daemons: namenode, secondary namenode, and jobtracker.
- On small cluster, it is convenient to put them on single machine; however as cluster gets larger, there are good reasons to separate them.
- Namenode has high memory requirements, as it holds file and block metadata for entire namespace in memory.
- Secondary namenode, while idle most of the time has comparable memory footprint to primary when it creates a checkpoint.
- For filesystems with large number of files, there may not be enough physical memory on one machine to run both the primary and secondary namenode.
- Secondary namenode keeps a copy of latest checkpoint of filesystem metadata that it creates.
- On busy cluster running lots of MapReduce jobs, jobtracker uses considerable memory and CPU resources, so it should run on dedicated node.
- When master daemons run on one or more nodes,following instructions may apply:
- Run the HDFS control scripts from namenode machine. The masters file should contain the address of secondary namenode.
- Run MapRedue control scripts from jobtracker machine.
When namenode and jobtracker are in separate nodes, their slaves files need to be kept in sync, since each node in cluster should run a datanode and tasktracker.
Environment Settings:
- Consider how to set variables in hadoop-env.sh
Memory:
- Hadoop allocates 1000MB(1GB) of memory to each daemon it runs.
- This is controlled by HADOOP_HEAPSIZE setting in hadoop-env.sh.
- Maximum number of map tasks that can run on tasktracker at one time is controlled by mapred.tasktracker.map.tasks.maximum property, which defaults to two tasks.
- Corresponding property for reduce tasks is mapred.tasktracker.reduce.tasks.maximum which also defaults to two tasks.
- Tasktracker has two map slots and two reduce slots.
- Memory given to each child JVM running task can be changed by setting mapred.child.java.opts property.
- Default setting is -Xmx200m, which gives each task 200MB of memory.
- If you had 8 processors and you wanted to run 2 processes on each processor, then you could set each of mapred.tasktracker.map.tasks.maximum and mapred.tasktracker.reduce.tasks.maximum to 7(not 8, since datanode and tasktracker each take one slot).
- For master nodes, each of namenode, secondary namenode and jobtracker daemons uses 1000 MB by default, total of 3,000MB.
How much memory does a namenode need?
- Default of 1,000MB of namenode memory is normally enough for few million files, but as rule of thumb for sizing purposes you can conservatively allow 1000MB per million blocks of storage.
- You can increase the namenodes memory without changing the memory allocated to other Hadoop Daemons by setting HADOOP_NAMENODE_OPTS in hadoop-env.sh
- If you change the namenodes memory allocation, dont forget to do same for secondary namenode(using HADOOP_SECONDARYNAMENODE_OPTS variable).
Java:
- Location of Java implementation to use is determined by the JAVA_HOME setting in hadoop-env.sh or from the JAVA_HOME shell environment variable, if not set in hadoop-env.sh.
- Its a good idea to set the value in hadoop-env.sh so that it is clearly defined in one place and to ensure that the whole cluster is using the same version of Java.
System logfiles:
- Stored in $HADOOP_INSTALL/logs by default.
- This can be changed using the HADOOP_LOG_DIR setting in hadoop-env.sh.
- Its a good idea to change this so that logfiles are kept out of the directory that Hadoop is installed in, since this keeps logfiles in one place even after the installation directory changes after an upgrade.
- Common choice is /var/log/hadoop, set by including the following line in hadoop-env.sh.
export HADOOP_LOG_DIR=/var/log/hadoop
- Each hadoop daemon running on a machine produces two logfiles.
- First is the log output written via log4j. Old logfiles are never deleted, so you should arrange for them to be periodically deleted or archived, so as to not run out of disk space on local node.
- Second logfile is combined standard output and standard error log.
This log file ends in .out, usually contains little or no output, since Hadoop uses log4j for logging.
- It is only rotated when daemon is restarted, and only last five logs are retained. Older logfiles are suffixed with number between 1 and 5, with 5 being oldest file.
- Logfile names(of both types) are combination of name of the user running the daemon, daemon name, and machine hostname. For ex, hadoop-tom-datanode-sturges.local.log.2008-07-04 is name of logfile after it has been rotated.
- Username in logfile name is default for the HADOOP_IDENT_STRING setting in hadoop-env.sh.
- If you wish to give Hadoop instance a different identity for purpose of naming the logfiles, change HADOOP_IDENT_STRING to be identifier you want.
SSH settings:
- Control scripts allow you to run commands on remote worker nodes from master node using SSH.
- It can be useful to customize the SSH settings, for various reasons.
- For ex, you may want to reduce the connection timeout(using ConnectTimeout option) so control scripts dont hang around waiting to see whether a dead node is going to respond. If timeout is too low, busy nodes will be skipped.
- Another useful SSH setting is StrictHostKeyChecking, which can be set to no to automatically add new host keys to the known hosts files.
- Hadoop control scripts can distribute configuration files to all nodes of the cluster using rsync.
- This is not enabled by default, but by defining HADOOP_MASTER setting in hadoop-env.sh, worker daemons will rsync the tree rooted at HADOOP_MASTER to the local nodes HADOOP_INSTALL whenever the daemon starts up.
- What is you have two masters - namenode and jobtracker on separate machines.
You can pick one as source and other can rsync from it, along with all the workers.
In fact, you can use any machine, even one outside the Hadoop Cluster, to rsync from.
- As HADOOP_MASTER is unset by default, there is bootstrapping problem: how to make sure hadoop-env.sh with HADOOP_ MASTER set is present on worker nodes?
- For small clusters, it is easy to write the small script to copy hadoop-env.sh from master to all the worker nodes.
- For large clusters, tools like dsh can do the copies in parallel.
Alternatively, suitable hadoop-env.sh can be created as part of the automated installation script.
- When starting a large cluster with rsyncing enabled, worker nodes can overwhelm master node with rsync requests since the workers start at around the same time.
- To avoid this, set the HADOOP_SLAVE_SLEEP setting to smaller number of seconds, such as 0.1 for one tenth of a second.
Important Hadoop Daemon Properties:
- Hadoop has bewildering number of configuration properties.
- We address the ones that you need to define for any real world working cluster.
- These properties are set in:
core-site.xml
hdfs-site.xml
mapred-site.xml
- Most properties are marked as final, in order to prevent them from being overridden by job configurations.
Example 9-1. A typical core-site.xml configuration file
<?xml version="1.0"?>
<!-- core-site.xml -->
<configuration>
<property>
<name>fs.default.name</name>
<value>hdfs://namenode/</value>
<final>true</final>
</property>
</configuration>
Example 9-2. A typical hdfs-site.xml configuration file
<?xml version="1.0"?>
<!-- hdfs-site.xml -->
<configuration>
<property>
<name>dfs.name.dir</name>
<value>/disk1/hdfs/name,/remote/hdfs/name</value>
<final>true</final>
</property>
<property>
<name>dfs.data.dir</name>
<value>/disk1/hdfs/data,/disk2/hdfs/data</value>
<final>true</final>
</property>
<property>
<name>fs.checkpoint.dir</name>
<value>/disk1/hdfs/namesecondary,/disk2/hdfs/namesecondary</value>
<final>true</final>
</property>
</configuration>
Example 9-3. A typical mapred-site.xml configuration file
<?xml version="1.0"?>
<!-- mapred-site.xml -->
<configuration>
<property>
<name>mapred.job.tracker</name>
<value>jobtracker:8021</value>
<final>true</final>
</property>
<property>
<name>mapred.local.dir</name>
<value>/disk1/mapred/local,/disk2/mapred/local</value>
<final>true</final>
</property>
<property>
<name>mapred.system.dir</name>
<value>/tmp/hadoop/mapred/system</value>
<final>true</final>
</property>
<property>
<name>mapred.tasktracker.map.tasks.maximum</name>
<value>7</value>
<final>true</final>
</property>
<property>
<name>mapred.tasktracker.reduce.tasks.maximum</name>
<value>7</value>
<final>true</final>
</property>
<property>
<name>mapred.child.java.opts</name>
<value>-Xmx400m</value>
<!-- Not marked as final so jobs can include JVM debugging options -->
</property>
</configuration>
HDFS:
- To run HDFS, you need to designate one machine as a namenode.
- In this case, the property fs.default.name is an HDFS filesystem URI, whose host is the namenodes hostname or IP address, and port is port that the namenode will listen on for RPCs.
- If no port is specified, default of 8020 is used
- Master file that is used by control scripts is not used by HDFS(or MapReduce) daemons to determine hostnames.
- In fact, as masters file is only used by scripts, you can ignore it if you dont use them.
- If you are running HDFS, fact that fs.default.name is used to specify both the HDFS namenode and the default filesystem means HDFS has to be the default filesystem in server configuration.
- It is possible to specify different filesystem as default in client configuration, for convenience.
- There are few other configuration properties you should set for HDFS: those that set storage directories for namenode and for datanodes.
- Property dfs.name.dir specifies list of directories where namenode stores persistent filesystem metadata.
- Copy of each of the metadata file is stored in each directory for redundancy.
- It is common to configure dfs.name.dir so that namenode metadata is written to one or two local disks, and remote disk, such as an NFS mounted directory.
- You also set the dfs.data.dir property, which specifies list of directories for datanode to store its blocks.
- Unlike namenode, which uses multiple directories for redundancy, datanode round robins writes between its storage directories, so for performance you should specify storage directory for each local disk.
- For maximum performance, you should mount storage disks with noatime option.
- This setting means that last accessed time information is not written on file reads, which gives significant performance gains.
- fs.checkpoint.dir property specifies list of directories where checkpoints are kept.
- Checkpointed filesystem image is stored in each checkpoint directory for redundancy.
MapReduce:
- To run MapReduce, you need to designate one machine as jobtracker, which on small cluster may be same machine as namenode.
- To do this, set the mapred.job.tracker property to hostname or IP address and port that jobtracker will listen to.
- Port number 8021 is common choice.
- During MapReduce job, intermediate data and working files are written to temporary local files.
- mapred.local.dir property takes a comma seperated list of directory names, and you should use all available local disks to spread disk I/O.
- MapReduce uses distributed filesystem to share files(such as job JAR file) with tasktrackers that run the MapReduce tasks.
- mapred.system.dir property is used to specify directory where these files can be stored.
Hadoop Daemon Addresses and Ports:
- Hadoop daemons generally run both an RPC server for communication between daemons and HTTP server to provide web pages for human consumption.
- Each server is configured by setting the network address and port number to listen to.
- By specifying network address as 0.0.0.0.
- Hadoop will bind to all addresses on the machine.
- Alternatively you can specify single address to bind to.
- Port number of 0 instructs the server to start on free port: this is generally discouraged, since it is incompatible with setting cluster wide firewall policies.
Other Hadoop Properties:
Cluster membership:
- To aid addition and removal of nodes in the future, you can specify file containing list of authorized machines that may join cluster as datanodes or tasktrackers.
- File is specified using dfs.hosts(for datanodes) and mapred.hosts(for tasktrackers) properties, as well as corresponding dfs.hosts.exclude and mapred.hosts.exclude files used for decommissioning.
Buffer Size:
- Hadoop uses buffer size of 4KB(4,096 bytes) for its I/O operations.
- You will likely see performance benefits by increasing it: 128KB is common choice.
- Set this using io.file.buffer.size property in core-site.xml.
HDFS block size:
- HDFS block size is 64MB by default, but many clusters use 128MB or even 256MB to ease memory pressure on namenode and to give mappers more data to work on.
- Set this using dfs.block.size property in hdfs-site.xml.
Reserved storage space:
- By default, datanodes will try to use all of the space available in their storage directories.
- If you want to reserve some space on storage volumes for no HDFS use, then you can set dfs.datanode.du.reserved to the amount, in bytes, of space in reserve.
Trash:
- Hadoop filesystem have trash facility, in which deleted files are not actually deleted, but rather moved to trash folder, where they remain for minimum period before being permanently deleted by system.
- Minimum period in minutes that file will remain in trash is set using fs.trash.interval configuration property in core-site.xml.
- By default, trash interval is zero, which disables trash.
- When trash is enabled, each user has her own trash directory called .Trash in her home directory.
- File recovery is simple: you look for the file in a subdirectory of .Trash and move it out of trash subtree.
- HDFS will automatically delete files in trash folders, but other filesystems will not, so you have to arrange for this to be done periodically.
- You can expunge the trash, which will delete files that have been in trash longer than their minimum period, using the filesystem shell:
% hadoop fs -expunge
Reduce slow start:
- By default, schedulers wait until 5% of map tasks in job have completed before scheduling reduce tasks for same job.
- For large jobs this can cause problems with cluster utilization, since they take up reduce slots while waiting for map tasks to complete.
- Setting mapred.reduce.slowstart.completed.maps to higher value, such as 0.80, can help improve throughput.
-
User account creation:
- Once you have Hadoop cluster up and running, you need to give users access to it.
- This involves creating home directory for each user and setting ownership permissions on it:
% hadoop fs -mkdir /user/username
% hadoop fs -chown username:username /user/username
- You can set space limits on the directory.
- The following sets a 1TB limit on given user directory:
% hadoop dfsadmin -setSpaceQuota 1t /user/username
YARN Configuration:
- YARN is next generation architecture for running.
- Under YARN, you no longer run a jobtracker or tasktracker.
- There is single resource manager running on same machine as HDFS namenode or on dedicated machine and node managers running on each worker node in cluster.
- YARN start-all.sh script starts the YARN daemons in the cluster.
- This script will start the resource manager and a node manager on each machine listed in slaves file.
- YARN also has job history server daemon that provides users with details of past jobs.
Important YARN Daemon Properties:
- Example: An example set of site configuration files for running MapReduce on YARN
<?xml version="1.0"?>
<!-- mapred-site.xml -->
<configuration>
<property>
<name>mapred.child.java.opts</name>
<value>-Xmx400m</value>
<!-- Not marked as final so jobs can include JVM debugging options -->
</property>
</configuration>
<?xml version="1.0"?>
<!-- yarn-site.xml -->
<configuration>
<property>
<name>yarn.resourcemanager.address</name>
<value>resourcemanager:8040</value>
</property>
<property>
<name>yarn.nodemanager.local-dirs</name>
<value>/disk1/nm-local-dir,/disk2/nm-local-dir</value>
<final>true</final>
</property>
<property>
<name>yarn.nodemanager.aux-services</name>
<value>mapreduce.shuffle</value>
</property>
<property>
<name>yarn.nodemanager.resource.memory-mb</name>
<value>8192</value>
</property>
</configuration>
- YARN resource manager is controlled via yarn.resourcemanager.address, which takes form of host-port pair.
- mapreduce.framework.name should be set to yarn for client to use YARN rather than local job runner.
-
Memory:
- YARN allows applications to request arbitrary amount of memory for a task.
- In YARN model, node managers allocate memory from pool, so number of tasks that are running on particular node depends on sum of their memory requirements, and not simply on fixed number of slots.
- Number of map versus reduce slots that are in demand changes over time: at beginning of job only map slots are needed, while at the end of the job only reduce slots are needed.
- YARN avoids this problem by not distinguishing between two types of slot.
- Each Hadoop Daemon uses 1,000MB so for a datanode and node manager total is 2,000MB.
- Next step is to determine how to set memory options for individual jobs. There are two controls:
- mapred.child.java.opts which allows you to set JVM heap size of map or reduce task, and
- mapreduce.map.memory.mb which is used to specify how much memory you need for map(or reduce) task containers.
- Schedulers may impose a minimum or maximum on memory allocations.
- For capacity scheduler default minimum is 1024 MB and default maximum is 102040 MB.
YARN Daemon Addresses and Ports:
- YARN daemons run one or more RPC servers and HTTP servers
Delegation Tokens:
- In distributed system like HDFS or MapReduce, there are many client server interactions, each of which must be authenticated.
- HDFS read operation will involve multiple calls to namenode and calls to one or more datanodes.
- Hadoop uses delegation tokens to allow later authenticated access without having to contact KDC again.
- A delegation token is generated by server(namenode in this case), and can be thought of as shared secret between client and server.
- On first RPC call to namenode, client has no delegation token, so it uses Kerberos to authenticate, and as part of response it gets a delegation token from the namenode.
- When it wants to perform operations on HDFS blocks, the clients uses special kind of delegation token, called block access token, that namenode passes to the client in response to metadata request.
- Client uses block access token to authenticate itself to datanodes.
- This property is enabled by setting dfs.block.access.token.enable to true.
- Delegation tokens are used by jobtracker and tasktrackers to access HDFS during course of the job.
- When the job has finished, delegation tokens are invalidated.
- Delegation tokens are automatically obtained for default HDFS instance, but if your job needs to access other HDFS clusters, then you have delegation tokens for these loaded by setting the mapreduce.job.hdfs-servers job property to comma seperated list of HDFS URIs.
Other security enhancements:
- Users can view and modify only their own jobs, not others.
This is enabled by setting mapred.acls.enabled to true. There are two job configuration properties:
mapreduce.job.acl-view-job and mapreduce.job.acl-modify-job, which may be set to comma separated list of users to control who may view or modify particular job.
- Shuffle is secure, preventing a malicious user from requesting another users map outputs.
- Datanode may be run on a priviliged port(one lower than 1024) , so client may be reasonably sure that it has started securely.
- A task may only communicate with its parent tasktracker, thus preventing an attacker from obtaining MapReduce data from another users job.
Hadoop Benchmarks:
- Most of the benchmarks show usage instructions when invoked with no arguments. For ex:
% hadoop jar $HADOOP_INSTALL/hadoop-*-test.jar TestDFSIO
TestFDSIO.0.0.4
Usage: TestFDSIO -read | -write | -clean [-nrFiles N] [-fileSize MB] [-resFile
resultFileName] [-bufferSize Bytes]
Benchmarking HDFS with TestDFSIO
- TestDFSIO tests the I/O performance of HDFS.
- It does this by using a MapReduce job as convenient way to read or write files in parallel.
- Each file is read or written in separate map task. and output of map is used for collecting statistics relating to the file just processed.
The following command writes 10 files of 1,000 MB each:
% hadoop jar $HADOOP_INSTALL/hadoop-*-test.jar TestDFSIO -write -nrFiles 10
-fileSize 1000
At the end of the run, the results are written to the console and also recorded in a local
file (which is appended to, so you can rerun the benchmark and not lose old results):
% cat TestDFSIO_results.log
----- TestDFSIO ----- : write
Date & time: Sun Apr 12 07:14:09 EDT 2009
Number of files: 10
Total MBytes processed: 10000
Throughput mb/sec: 7.796340865378244
Average IO rate mb/sec: 7.8862199783325195
IO rate std deviation: 0.9101254683525547
Test exec time sec: 163.387
The files are written under the /benchmarks/TestDFSIO directory by default (this can
be changed by setting the test.build.data system property), in a directory called
io_data.
To run a read benchmark, use the -read argument. Note that these files must already
exist (having been written by TestDFSIO -write):
% hadoop jar $HADOOP_INSTALL/hadoop-*-test.jar TestDFSIO -read -nrFiles 10
-fileSize 1000
Here are the results for a real run:
----- TestDFSIO ----- : read
Date & time: Sun Apr 12 07:24:28 EDT 2009
Number of files: 10
Total MBytes processed: 10000
Throughput mb/sec: 80.25553361904304
Average IO rate mb/sec: 98.6801528930664
IO rate std deviation: 36.63507598174921
Test exec time sec: 47.624
When you’ve finished benchmarking, you can delete all the generated files from HDFS
using the -clean argument:
% hadoop jar $HADOOP_INSTALL/hadoop-*-test.jar TestDFSIO -clean
Benchmarking MapReduce with Sort
Hadoop comes with a MapReduce program that does a partial sort of its input. It is
very useful for benchmarking the whole MapReduce system, as the full input dataset
is transferred through the shuffle. The three steps are: generate some random data,
perform the sort, then validate the results.
First we generate some random data using RandomWriter. It runs a MapReduce job
with 10 maps per node, and each map generates (approximately) 10 GB of random
binary data, with key and values of various sizes. You can change these values if you
like by setting the properties test.randomwriter.maps_per_host and
test.randomwrite.bytes_per_map. There are also settings for the size ranges of the keys
and values; see RandomWriter for details.
Here’s how to invoke RandomWriter (found in the example JAR file, not the test one) to
write its output to a directory called random-data:
% hadoop jar $HADOOP_INSTALL/hadoop-*-examples.jar randomwriter random-data
Next we can run the Sort program:
% hadoop jar $HADOOP_INSTALL/hadoop-*-examples.jar sort random-data sorted-data
The overall execution time of the sort is the metric we are interested in, but it’s instructive
to watch the job’s progress via the web UI (http://jobtracker-host:50030/),
where you can get a feel for how long each phase of the job takes. Adjusting the
parameters mentioned in “Tuning a Job” on page 176 is a useful exercise, too.
As a final sanity check, we validate that the data in sorted-data is, in fact, correctly
sorted:
% hadoop jar $HADOOP_INSTALL/hadoop-*-test.jar testmapredsort -sortInput random-data \
-sortOutput sorted-data
This command runs the SortValidator program, which performs a series of checks on
the unsorted and sorted data to check whether the sort is accurate. It reports the outcome
to the console at the end of its run:
SUCCESS! Validated the MapReduce framework's 'sort' successfully.
Other benchmarks
There are many more Hadoop benchmarks, but the following are widely used:
• MRBench (invoked with mrbench) runs a small job a number of times. It acts as a good
counterpoint to sort, as it checks whether small job runs are responsive.
• NNBench (invoked with nnbench) is useful for load testing namenode hardware.
Hadoop in the cloud:
Hadoop on Amazon EC2
- Amazon Elastic Compute Cloud (EC2) is a computing service that allows customers
to rent computers (instances) on which they can run their own applications. A customer
can launch and terminate instances on demand, paying by the hour for active instances.
- Setup:
First install Whirr by downloading a recent release tarball, and unpacking it on the
machine you want to launch the cluster from, as follows:
% tar xzf whirr-x.y.z.tar.gz
Whirr uses SSH to communicate with machines running in the cloud, so it’s a good
idea to generate an SSH keypair for exclusive use with Whirr. Here we create an RSA
keypair with an empty passphrase, stored in a file called id_rsa_whirr in the current
user’s .ssh directory:
% ssh-keygen -t rsa -P '' -f ~/.ssh/id_rsa_whirr
- We need to tall Whirr our cloud provider credentials.
- We can export them as environment variables as follows, although you can specify them on command line, or in configuration file for service.
% export AWS_ACCESS_KEY_ID='...'
% export AWS_SECRET_ACCESS_KEY='...'
Launching a cluster:
- We are now ready to launch a cluster. Whirr comes with several recipes files for
launching common service configurations, and here we use the recipe to run Hadoop
on EC2:
% bin/whirr launch-cluster --config recipes/hadoop-ec2.properties \
--private-key-file ~/.ssh/id_rsa_whirr
The launch-cluster command provisions the cloud instances and starts the services
running on them, before returning control to the user.
Configuration:
The recipe file is actually just a Java properties file that defines a number of Whirr
properties. Let’s step through the salient properties from hadoop-ec2.properties, starting
with the two properties that define the cluster and the services running on it:
whirr.cluster-name=hadoop
whirr.instance-templates=1 hadoop-namenode+hadoop-jobtracker,5 hadoop-datanode+hadoop-tasktracker
The next group of properties specify cloud credentials:
whirr.provider=aws-ec2
whirr.identity=${env:AWS_ACCESS_KEY_ID}
whirr.credential=${env:AWS_SECRET_ACCESS_KEY}
The final three parameters offer control over the cluster hardware (instance capabilities,
like memory, disk, CPU, network speed), the machine image (operating system), and
geographic location (data center). These are all provider dependent, but if you omit
them then Whirr will try to pick good defaults.
whirr.hardware-id=c1.xlarge
whirr.image-id=us-east-1/ami-da0cf8b3
whirr.location-id=us-east-1
Running a proxy:
To use the cluster, network traffic from the client needs to be proxied through the
master node of the cluster using an SSH tunnel, which we can set up using the following
command:
% . ~/.whirr/hadoop/hadoop-proxy.sh
You should keep the proxy running as long as the cluster is running. When you have
finished with the cluster, stop the proxy with Ctrl-c.
Running a MapReduce job:
- When we launched the cluster, Hadoop site configuration files were created in the
directory ~/.whirr/hadoop. We can use this to connect to the cluster by setting the
HADOOP_CONF_DIR environment variable as follows:
% export HADOOP_CONF_DIR=~/.whirr/hadoop
The cluster’s filesystem is empty, so before we run a job, we need to populate it with
data. Doing a parallel copy from S3 (see “Hadoop Filesystems” on page 54 for more on
the S3 filesystems in Hadoop) using Hadoop’s distcp tool is an efficient way to transfer
data into HDFS:
% hadoop distcp \
-Dfs.s3n.awsAccessKeyId='...' \
-Dfs.s3n.awsSecretAccessKey='...' \
s3n://hadoopbook/ncdc/all input/ncdc/all
After the data has been copied, we can run a job in the usual way:
% hadoop jar hadoop-examples.jar MaxTemperatureWithCombiner \
/user/$USER/input/ncdc/all /user/$USER/output
Alternatively, we could have specified the output to be on S3, as follows:
% hadoop jar hadoop-examples.jar MaxTemperatureWithCombiner \
/user/$USER/input/ncdc/all s3n://mybucket/output
You can track the progress of the job using the jobtracker’s web UI, found at http://
master_host:50030/. To access web pages running on worker nodes, you need set up a
proxy auto-config (PAC) file in your browser. See the Whirr documentation for details
on how to do this.
Shutting down a cluster:
- To shut down the cluster, issue the destroy-cluster command:
% bin/whirr destroy-cluster --config recipes/hadoop-ec2.properties
This will terminate all the running instances in the cluster and delete all the data stored
in the cluster.
No comments:
Post a Comment